rava dosa recipe

Rava Dosa Recipe | Rava Dosa | Instant Rava Dosa Recipe

Rava Dosa Recipe

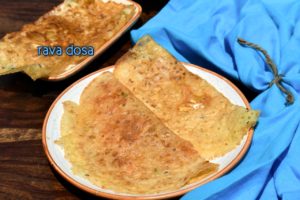
Rava Dosa Recipe with step by step pictures- Rava Dosa is a crisp crepe made with semolina, rice flour, and all-purpose flour; mildly flavored with green chilies, ginger, curry leaves, and cumin seeds. Rava dosa is an instant dosa and does not call for soaking or fermentation. This dosa can be prepared instantly with very few ingredients easily and generally available in the Indian pantry. To make perfect rava dosa, you need to take care of a few things and the same have been explained in this blog. Rava dosa can be served with the chutney of your choice.

Ingredients for Rava Dosa Recipe

Semolina/Sooji: Simple rava has been used to make the rava dosa.

Rice Flour: It helps to make the dosa crispy.

All-purpose flour: It gives a binding to the dosa

Gram flour: This is an optional ingredient, but it adds flavor to the dosa.

Ginger, chili, cumin seeds, curry leaves: These ingredients are used to flavor the rava dosa. It is important to not over-do any of these ingredients although you can increase or decrease the quantity of each of the ingredients as per your liking. Further, you can also use asafetida; fresh coriander leaves, etc to flavor the dosa.

Water: This is a very important ingredient for rava dosa recipe. Enough water should be added. As much as 4 times water is used to make perfect rava dosa.

Oil: Little oil is used to cook the dosa.

How to make Rava Dosa?

Perfect rava dosa is crispy, non-oily and not dry. To get a perfect rava dosa you need to take care of the following points:

  1. Make sure to maintain the correct consistency of the batter of the dosa. It should be watery.
  2. Use a correct pan or skillet to make rava dosa. I prefer to use a non-stick pan to make rava dosa. You can use any iron pan which is well seasoned.
  3. Make sure the pan is sufficiently hot when you pour the batter.
  4. The batter can be poured using a ladle or bowl or hand. I prefer to sprinkle it with my hand.
  5. Patiently cook the dosa for 4-5 minutes.
  6. Once you see brown patches at the bottom, flip it and cook the other side too.
  7. Once the dosa is cooked from one side, it will come off easily. If you find difficulty in flipping it, let it cook for a few more seconds.
  8. Serve it hot.

Recipes similar to Rava Dosa Recipe

You might also like dosa recipe, dal dosa, oats dosa, leftover rice recipe.

How to serve Rava Dosa?

Serve it hot with coconut chutney for a weekday breakfast.

Rava Dosa Recipe

1.This recipe makes 10-12 rava dosa.

rava dosa recipe

2.In a mixing bowl, add ½ cup semolina (sooji).

rava dosa recipe

3.Next add in ½ cup rice flour (chawal ka atta).

rava dosa recipe

4.Add 2 tbsp of gram flour (besan).

rava dosa recipe

5.Also add ¼ cup all purpose flour (maida).

rava dosa recipe

6.Add in 1 chopped green chili.

rava dosa recipe

7.Next add 1 tsp grated ginger.

rava dosa recipe

8.Also add in ½ tsp cumin seeds (jeera).

rava dosa recipe

9.Add salt to taste.

rava dosa recipe

10.Mix well.

rava dosa recipe

11.Add 2 cups of water.

rava dosa recipe

12.Mix well till lump free.

rava dosa recipe

13.Add in more water. Mix. Add till buttermilk like consistency. I have used total three and a half cups of water.

rava dosa recipe

14.Cover and leave the mixture for 10 minutes.

rava dosa recipe

15.After 10 minutes, mix the batter. Check and adjust the consistency and seasoning.

rava dosa recipe

16.Heat a non stick pan, till hot.

rava dosa recipe

17.Use a ladle and pour the batter on hot pan.

rava dosa recipe

18.Or using your hand, sprinkle the batter on the pan.

rava dosa recipe

19.Drizzle little oil around and on the dosa.

rava dosa recipe

20.Let it cook on medium flame for 3-4 minutes.

rava dosa recipe

21.Once the bottom turns brownish, flip the dosa. Cook from the other side too, for 30 seconds.

rava dosa recipe

22.Serve hot. Bon appetite!

rava dosa recipe

Tried this recipe?

Please rate us and share your valuable feedback

Let’s Connect

Recipe Videos

[sbvcytc template="7" layout="fitrows" results_per_page="5" no_of_columns_desktop="1" no_of_columns_tablet="1" grid_thumbnail_size="default" title_font_size="15" title_font_weight="700" enable_description="" enable_hd_tag="" enable_video_length="" enable_video_views="" enable_video_likes="" enable_video_post_time="" enable_social_sharing="" pagination_type="disabled" preview_related="" enable_carousel="" channel_id="UCY9O2iE3fv9vZkacrmre99w" api_key="AIzaSyAXCSUG20XxTmVFUTI3rreWcikoNUel0qg" custom_wrapper_class="videos_page side_bar_video"]

Latest Recipes

About the Author

Author’s Name

Vini

Hi! I am CA Vini Mehta. A Chartered Accountant by profession, a food blogger by passion! First of all, I would like to thank you for stopping by at Viniscookbook, I hope you have a good time. Here, yo...u will find the recipes which have been tried, at times re-tried in my kitchen and relished on the dining table. I am mother of two kids and the wife of a person with a high and selective taste sense, so basically anything, before finding its place on the blog, has many levels to cross and clear. This journey started a couple of years back. Before that I was making the most usual kind of food. The only experiment used to be asking my mother how to make something new or different☺. Then, one day, I tried a recipe for butter cookies. And they did not get to go in the container as they were over before I could store them. That day I was introduced to the joy of experimenting with recipes. And I loved everything else that followed especially garnishing and photographing food. I am still not well versed with the photography dos and don’ts but I love to experiment and learn, be it photography or cooking. Hope you too enjoy this journey as much as I do☺! Stay healthy, stay tuned!.

Trending Recipes

"); newWindow.document.getElementsByTagName("head")[0].appendChild(style); newWindow.document.getElementsByTagName("head")[0].appendChild(style1); newWindow.document.close(); jQuery('.printBlock').show(); } jQuery('.print_btn').on('click',function(){ printData(); })jQuery(document).ready(function () { jQuery("#reletedpostslide").owlCarousel({ margin: 9, nav: true, navText: ["
", "
"], loop: false, navigation: true, touchDrag: true, mouseDrag: false, responsive: { 0: { items: 1 }, 380: { items: 1 }, 480: { items: 1 }, 768: { items: 3 }, 992: { items: 4 } } }) });