
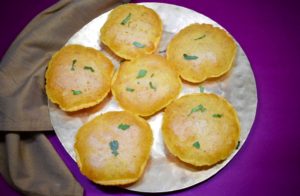
Crispy and puffed up pooris made using maize flour (makki ka aata) is makki ki poori. The poori has wonderful texture as it is crisp as well as crumbly. I always thought that makki poori must be tricky but I was surprised to see how simple it was. Each poori puffed beautifully and remained puffed till served or till punctured, you know what I mean!! I tried the recipe of makai poori towards the end of winters, otherwise, we would have indulged in it more, however, I was too happy to see how it turned out and therefore am sharing it. It can be served with any gravy of your choice.
A combination of cornmeal (makki ka aata) and whole wheat flour is used for makki ki poori. The pooris are flavored with carom seeds (ajwain). A stiff dough, as we make for poori has to be prepared. I have not added any other ingredients to flavor makai ki poori, you can add in the spices or herbs of your choice.
Poori lovers are in the right place. Here is a collection of poori recipes which you will love for sure. It has everything from the perfect basic poori to kesar poori. Another makka based recipe is makai ka dhokla. View the recipe here.
1. Add all the ingredients in a mixing bowl or paraat. (Except oil for frying)(Obviously!!).
2. Mix well.
3. Gradually add water and knead the dough as we do for poori. It should be a stiff dough.
4. Let the dough rest for 15-20 minutes. Thereafter knead again for 2 minutes and make portions. Roll into balls and flatten the balls. Simultaneously heat enough oil.
5. Place the dough portion on the rolling board and roll into poori (should not be thin).
6. Put in hot oil. The poori puffs up on its own if it doesn’t slightly press with a perforated spoon to puff it. Once it is cooked from the bottom, flip it and cook from the other side too.
7. Cook till golden from both the sides.
8. Bon appétit!

PREP TIME 10 minutes + 20 minutes rest time
COOK TIME 20 minutes
TOTAL TIME 50 minutes
• 1 cup cornmeal (makai ka aata)
• 1 cup whole wheat flour (gehun ka aata)
• ½ tsp carom seeds, crushed
• Salt to taste
• 2 tsp oil + oil for frying
1. Add all the ingredients in a mixing bowl or paraat. (Except oil for frying)(Obviously!!).
2. Mix well.
3. Gradually add water and knead dough as we do for poori. It should be stiff dough.
4. Let the dough rest for 15-20 minutes. Thereafter knead again for 2 minutes and make portions. Roll into balls and flatten the balls. Simultaneously heat enough oil.
5. Place the dough portion on the rolling board and roll into poori (should not be thin).
6. Put in hot oil. Slightly press with a perforated spoon to puff it. Once it is cooked from the bottom flip it and cook from the other side too.
7. Cook till golden from both the sides.
8. Bon appétit!

Please rate us and share your valuable feedback


Visitor Rating: 3 Stars
thanx
What a nice recipe of pooris thanks
thanx
Visitor Rating: 5 Stars
Visitor Rating: 4 Stars
thanx