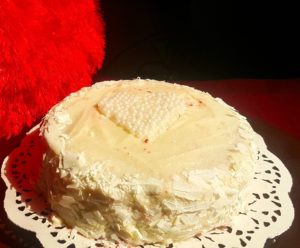
Eggless Red Velvet Cake is a beautiful cake with an awesome texture and great taste. Cocoa powder and butter milk give a unique flavor to the cake. Cream cheese frosting adds not only to the look of the cake but also its oomph.
Red velvet cake is all about the correct ratio and quantity of cocoa powder, buttermilk, and red food coloring. I have used AmeriColor’s red food coloring. 1 tbsp of it gave me the most gorgeous red color. As regards the frosting, cream cheese frosting does most justice to the eggless red velvet cake. But you can always go for the classically cooked frosting or the old-fashioned white frosting.
Maybe I like to experiments with other cakes such as eggless chocolate truffle cake, eggless marble cake, eggless tutti frutti cake, eggless sponge cake etc. And may be you too would like to try these :).
1. Do the preparations : Pre-heat the oven to 180⁰C (160⁰C in case of a fan or convection oven). Grease, dust, and line with parchment paper 2 six inches cake pan or 1 eight or nine-inch cake pan. Measure/preferably weigh the ingredients. Tying a towel strip around the cake pan ensures a flat top of the cake.
2. Make dry ingredients mix : Place a sieve over a large bowl. Sieve 1 and 1/2 cup all purpose flour, 2 tbsp corn flour, and 2 tsp cocoa powder.
3. Make butter sugar oil mix : In another bowl take 1/4 cup butter and 1 and 1/2 heaped cup powdered sugar. Mix it well. Add 1/4 cup oil. Cream everything together till light and fluffy. The ingredients should be at room temperature
4. Make buttermilk mix : In another bowl take 1/4 cup curd. Add 3/4 cup water. Whisk well. That’s the buttermilk. Add 1 tbsp red food coloring. Add 1 tsp vanilla extract. And mix everything well. The ingredients should be at room temperature.
5. Prepare the cake mix : Bring together the dry ingredients mix, butter sugar oil mix, and buttermilk mix. Add the dry ingredients in butter sugar oil mix and also add buttermilk mixture to it. Do it in batches. Do not over-mix .
6. Add baking soda and vinegar : Mix 1 tsp baking soda and 1 tsp vinegar. Add to the cake mix.
7. Bake the cake : Pour the gorgeous red cake batter in prepared cake tins. This the point of time when you know you are doing something to correct. Tap to get rid of the air bubbles. Put in a pre-heated oven and bake at 180⁰C (160⁰C in case of a fan or convection oven) for 30-35 minutes or till the cake is done. Let it cool on a wired rack for 10 minutes then de-mold. And let it cool completely. The cake is done when the center and the sides of the cake feel the same. The inserted toothpick comes out clean or has cake crumbs and not cake batter. The cake has left the sides of the pan.
8. Prepare cream cheese frosting : In a bowl add 1/2 cup butter, 1 cup cream cheese, 3-4 cups of icing sugar. Mix everything well. Refrigerate the frosting for 2 hours.I have used homemade cream cheese. Here is the link to the recipe.
9. Prepare sugar syrup : Mix 2 tbsp sugar in 1/4 cup water.
10. Assemble the cake : Cut off the top of the cake if it has a dome. I just inverted the cake. Apply sugar syrup and then apply cream cheese frosting. Cover the crumb of the cake. Refrigerate for 1/2 an hour. Thereafter cover the cake using remaining cream cheese frosting. Add some white chocolate flakes and sprinkles to decorate. Refrigerate for 1/2 an hour so that the cake sets.
11. Bon appétit : Make the eggless red velvet cake this Valentine’s Day.
PREP TIME 15 minutes
COOK TIME 40-45 minutes
TOTAL TIME 1 hour

Pre-heat the oven to 180/160
Grease and dust and line with parchment paper 2 six inches cake pan or 1 eight or nine inch cake pan.
Measure/preferably weigh the ingredients.
Tip: Tying a towel strip around the cake pan ensures flat top of the cake.
Place a sieve over a large bowl. Sieve 1 and 1/2 cup all purpose flour, 2 tbsp corn flour and 2 tsp cocoa powder.
In another bowl take 1/4 cup butter and 1 and 1/2 heaped cup powdered sugar. Mix it well. Add 1/4 cup oil. Cream everything together till light and fluffy.
Tip: The ingredients should be at room temperature.
In another bowl take 1/4 cup curd. Add 3/4 cup water. Whisk well. That’s your buttermilk. Add 1 tbsp red food coloring. Add 1 tsp vanilla extract. And mix everything well.
Tip: The ingredients should be at room temperature.
Bring together the dry ingredients mix, butter sugar oil mix and buttermilk mix. Add the dry ingredients in butter sugar oil mix and also add buttermilk mix to it. Do it in batches.
Tip: Do not over-mix otherwise even “control+s” won’t be able to save your cake.
Mix 1 tsp baking soda and 1 tsp vinegar. Add to the cake mix.
Pour the cake batter in prepared cake tins. Tap to get rid of the air bubbles. Put in a pre-heated oven and bake at 180 or 160 (in case of convection/fan oven) for 30-35 minutes or till the cake is done. Let it cool on a wired rack for 10 minutes then de-mould. And let it cool completely.
Tip: The cake is done when the centre and the sides of the cake feel the same. The inserted toothpick comes out clean or has cake crumbs and not cake batter. The cake has left the sides of the pan.
In a bowl add 1/2 cup butter, 1 cup cream cheese, 3-4 cups of icing sugar. Mix everything well. Refrigerate the frosting for 2 hours.
Mix 2 tbsp sugar in 1/4 cup water
Cut off the top of the cake if it has a dome. I just inverted the cake. Apply sugar syrup and then apply cream cheese frosting. Cover the crumb of the cake. Refrigerate for 1/2 an hour. Thereafter cover the cake using remaining cream cheese frosting. Refrigerate for 1/2 an hour so that the cake sets.
Make the eggless red velvet cake this Valentine’s Day.

Please rate us and share your valuable feedback