
Oreo needs no introduction and when this delicious cookie is coated with some more chocolate and when accessorized with few sprinkles it reaches to another level. Chocolate coated Oreos are great for gifting. These cuties are winner amongst the kids. Other than that Oreos dipped in chocolate can be prepared for kids’ parties or Christmas etc. They are very versatile. You can use the Oreos of your choice and also embellish the same as per your liking.
The recipe calls for very few ingredients. Oreos, good quality chocolate and sprinkles for decoration! And the best part is that each ingredient is customizable and there are options for each of the ingredient. For Oreos, you can choose any amongst the ones available to you. I have taken Original Oreos, Golden Oreos, and Strawberry flavored Oreos and Chocolate Oreos. For chocolate flavored Oreos I have used to milk chocolate and for the Golden and Strawberry Oreos I chose white chocolate. This way the flavors complimented each other very well. For garnishing, I chose my favorite colorful chocolate vermicelli. You can use colored sugar, confetti etc.
1.Put 375 g chocolate in a microwave safe bowl.
2.Microwave for 30 seconds on high power. Mix well. If required again microwave at 10 seconds interval. Depending on the temperature of the place where you stay and quality of chocolate the time needed to melt the chocolate varies. Basically you need to repeat the process till you get smooth chocolate. We don’t want a runny chocolate, just lump free. If it goes too runny, keep aside at room temperature for few minutes.
3.Take a cup cakes mould/pan. Line it with cup cake liners. You can also use silicon cup cake moulds. However I was not very happy with the finish I got with them.
4.Pour 1 tbsp of melted chocolate in each cavity.
5.Place Oreo in the centre. As such there is not much space there. SO its all a centre and no left or right alignment :D
6.On the Oreo pour another tbsp of melted chocolate. And coat the Oreo with chocolate properly. Tap to get rid of any air bubbles.
7.Add little sprinkles on it.
8.Just give a light tap/shake.
9.Refrigerate for 15 minutes or till set. I popped in the freezer for 10 minutes or so.
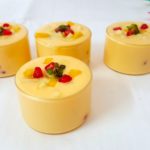
10.Remove the liner. It will come off easily.
11.Bon appétit! I prepared these for my daughter’s 11th birthday for distribution in class.
PREP TIME 15-20 minutes
COOK TIME 30 seconds
TOTAL TIME 20 minutes

Please rate us and share your valuable feedback


Visitor Rating: 5 Stars
Good read. I really love experimenting and I think it is time I try this now!